Tuesday, May 19, 2009

Analyzing domain of the problem - GORM classes

[From the series - creating software books reviews grails web application]

In the previous posts I have created basic empty grails application. All the steps done to get up to this point are linked in this post. When the basic layout of the application is prepared it is obviously time to analyze domain objects. Domain objects in the grails are called GORM (grail's object relational mapping). Database schema is automatically generated from GORM objects and they probably represent the most powerful feature of the grails framework.

As software books reviews site is about providing reviews for the books the main features that need to be covered by application are following.

Visitor comes to the web site. From here he can navigate through existing books and read reviews and summaries. Review can be written on the site or link to the web site with the review can be provided. Summary is expressed as number (from 1 to 5) of some book aspects. Visitor can register and then he is able to post reviews and summaries for the books. Additionally there are some tasks for the administrator like: moderating books, posting new books...

If I try to express this short description as a list of user stories we get following:

As visitor I want to register.

As registered user I want to login.

As visitor I want to see books and reviews/summaries of the books.

As registered user I want to post book review.

As registered user I want to post summary.

As administrator I want to moderate books (this is probably epic).

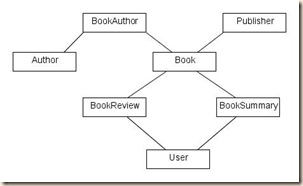
Although user stories should be implemented one by one it is not a mistake to make an overview of the whole system. So described system can be pictured like this:

domain_model

On the picture above I have depicted domain object classes that I will create for the sbr project. For those that already have some knowledge about GORM the class BookAuthor may be surprising. In the GORM it is possible to model "many-to-many" relationship directly. I don't like this way and most of the time I create additional domain class that is representing connection object. Of course you can use what ever approach but for me this is much more flexible because I can easily navigate in both directions in the relationship and even having custom logical methods in the connecting class - BookAuthor in this case.

Let me write few words about this domain objects model. As you can see the central place in the model plays the Book class. It is not surprise because sbr is more or less about books. For each book we want to have different details except reviews and summaries. Those details are Author and Publisher.

The relationship between Book and Author is many-to-many. This means that each book can have more than one author and each author can write more than one book. Thus domain object BookAuthor is created.

The relationship between Book and Publisher is many-to-one. This means that each book can have only one publisher. Or from the other point of the relationship, each publisher can publish many books.

Next interesting part of the diagram is BookReview and BookSummary and User. The logic here is that book review and book summary must be provided for an existing book by an existing user. There is no limit on the domain level how many reviews/summaries user can provide for the same book. This limit is set as a business logic. Registered user can post one review/summary per book while moderator can post many reviews per book and one summary per book.

Knowing all these we are ready to start with implementation. If you do it in hurry you can start with the book class. But as we already know that we will need possibility to register and we will need User class it is good moment to have a look into grails plugins.

Before you start implementing anything in the Grails it is good idea to see what is available from the Grails plugins. Very often functionality you need is already implemented as a plugin and you can simply reuse it. The same story is for registration and the User class. For software books reviews site I am using Spring security plugin (former Acegi security plugin). So you need to install this plugin. How to do that you can find in the plugins section of the Grails web site. After installing it create two roles: admin and user. This plugin offers out of the box login, logout, register pages and lot of useful methods that can be used in the application.

So in my next post I will install Spring (Acegi) security plugin, initialize default roles on the startup (if they are not initialized already) and then we will include register/login links on the home page and implement the first two user stories: As visitor I want to register and As registered user I want to login. So stay tuned.

P.S. Don't forget to write some review or post summary on the software books reviews.
Tuesday, May 5, 2009

Integrating blueprint into Grails application

[From the series - creating software books reviews grails web application]

In the previous post we have created home and admin page. Now it is time to create layout of the application. If you visit software books reviews site you can see that layout of the page is header and footer and three columns. If you are not a CSS expert creating such layout can be probably complex so it is good idea to use help of some CSS framework. My CSS framework is blueprint.

Blueprint is the grid based framework with the fixed width. Screen is divided into 24 columns and you can specify "boxes" and number of columns they should span through. The most important thing to remember is that sum of the box widths may not be bigger than 24. It can be smaller but not bigger.

The short example of the web page with the blueprint can look like this:

<div class="container">
<div id="one" class="span-24 last">
<!-- some content -->
</div>
<hr/>
<div id="two" class="span-4 colborder">
<!-- some content -->
</div>
<div id="three" class="span-14 colborder">
<!-- some content -->
</div>
<div class="span-4 last">
</div>
</div>

In this short code example the most important features of the blueprint framework are already visible.

The first div with class container is mandatory and blueprint will work inside this div.

<div id="one" class="span-24 last"> defines box that should spread through all 24 columns. This means that content will take the whole row of the screen. "last" class is used to specified that it is last box in the given row. This class has more sense when the sum of box widths is less than 24 but you want to put next box into the new row.

<hr> is blueprint tag that just makes more space between two rows.

Next three <divs> are actually more interesting. Here you are defining that row should be divided into three columns. First column of the width 4, next column of the width 14, and last column of the width 4. What you can notice immediately is that sum of these numbers is 22.

The reason is that class colborder separates two columns and actually takes the space of the whole column.

Now when we have basic knowledge about blueprint it is time to integrate it into our sbr application. The first step is to download the blueprint framework from their site. When you extract the downloaded zip file, copy the three css files from the blueprint folder. The file to copy are: ie.css, screen.css, and print.css.

You should copy them into web-app/css folder of the sbr application.

Now it is time to define layout of our application. As already mentioned we want that all pages are same and have header/footer and three columns: left, middle and right column. If you have read Starting with front-end in Grails application post then it should be clear that the right place where to specify this is the main.gsp template. This template specifies how all pages that are based on this template will look like. First of all we need to reference css files we have copied to the css folder. To do this change to grails-app/views/layouts/main.gsp to look like this:

<html>
<head>
<title><g:layoutTitle default="Grails" /></title>
<link rel="stylesheet" href="${createLinkTo(dir:'css',file:'main.css')}" />
<g:layoutHead />
<link rel="stylesheet" href="${createLinkTo(dir:'css',file:'screen.css')}" type="text/css" media="screen, projection" />
<link rel="stylesheet" href="${createLinkTo(dir:'css',file:'print.css')}" type="text/css" media="print" />
<link rel="stylesheet" href="${createLinkTo(dir:'css',file:'ie.css')}" type="text/css" media="screen, projection" />
<g:javascript library="application" />
</head>
<body>
<g:layoutBody />
</body>
</html>

The three lines to notice are:

<link rel="stylesheet" href="${createLinkTo(dir:'css',file:'screen.css')}" type="text/css" media="screen, projection" />
<link rel="stylesheet" href="${createLinkTo(dir:'css',file:'print.css')}" type="text/css" media="print" />
<link rel="stylesheet" href="${createLinkTo(dir:'css',file:'ie.css')}" type="text/css" media="screen, projection" />

They are added as specified by the blueprint framework. The only difference is that I have used createLinkTo grails construct.

Now when we are referencing necessary css files we can specify layout of the template.

<html>
<head>
<title><g:layoutTitle default="Grails" /></title>
<link rel="stylesheet" href="${createLinkTo(dir:'css',file:'main.css')}" />
<g:layoutHead />
<link rel="stylesheet" href="${createLinkTo(dir:'css',file:'screen.css')}" type="text/css" media="screen, projection" />
<link rel="stylesheet" href="${createLinkTo(dir:'css',file:'print.css')}" type="text/css" media="print" />
<link rel="stylesheet" href="${createLinkTo(dir:'css',file:'ie.css')}" type="text/css" media="screen, projection" />
<g:javascript library="application" />
</head>
<body>
<div class="container">
<div id="header" class="span-24 last">
header
</div>
<hr/>
<div id="left-sidebar" class="span-4 colborder">
left sidebar
</div>
<div id="content" class="span-14 colborder">
<g:layoutBody />
</div>
<div id="right-sidebar" class="span-4 last">
right sidebar
</div>
<hr/>
<div id="footer" class="span-24 last">
footer
</div>
</div>
</body>
</html>

As you can see that is quiet easy and understandable. And what is good it is all what we need to the to get required layout. If you start the application now you will see that home page of the sbr application has correct layout. Of course we still need to populate all parts with the real content but that will be part of the next posts.

I know that usually I am announcing what will be topic of the next post but this time I am not sure. But for sure good reading is introduction into grails templates and tag libs mechanism that I have described in this and this post.

P.S. Don't forget to write some review or post summary on the software books reviews.